Showing posts with label audio. Show all posts

Aug 15, 2011

Audio editing in energyXT

energyXT comes with audio editing built-in to each audio track. This tutorial will show you how to get started with the most used features. For advanced editing, you may also open recorded audio in an external audio editor directly from energyXT. 


Trimming audio


You can trim the start and end points of your recording. Click the start or end point of the audio and drag to the desired position. 


By default all editing will snap to the nearest beat, but you can change the resolution or turn off snapping in the toolbar. 


Splitting audio takes


There are several ways to split an audio file. You can press the alt button and right-click anywhere on the audio file or you can set the song position pointer and select Split from the Part menu (the shortcut is Ctrl + K). Make sure to select the part you want to split. 


You can now edit, move and copy the two audio files separately. 


Fade-in/out


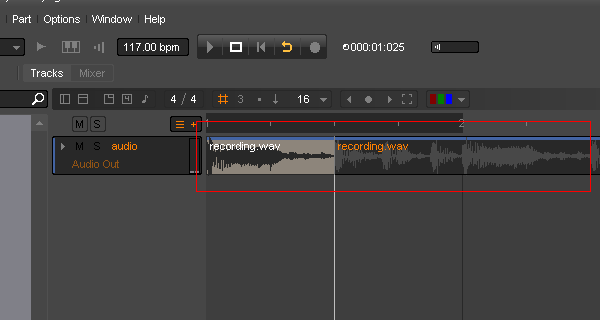
If your audio recording has unwanted clicks/pops at the beginning or end you may select to fade in or fade out the volume with a specified number of ms. Open the object-bar to access the fade in and out option. 


You may also cross-fade two audio files by overlapping them, select both and right-click for popup menu, and finally select Crossfade from the Process menu. 


Reversing playback


In the object-bar you may also select if the audio file is played back in forward or reverse mode. 


Render mode


For more advanced playback option you may specify the render mode for each audio file. Select between Normal, Re-pitch and Stretch. 


In Normal mode the audio will always be played back at the same speed/frequency as recorded.  


In Re-pitch mode the sample will play faster or slower depending on the current tempo. Changing the tempo will also change the frequency of the audio file. If you don't want this effect set the audio file in Stretch mode. This option will automatically stretch and pitch the audio to the current tempo. 


In Normal and Stretch mode you have also Coarse and Fine tuning control over the audio file. 


Setting the track in edit mode


For more detailed audio  editing you need to set the track in edit-mode. Double-click or right-click the track and select edit from the popup menu.


You will now see a bigger view of the recorded (or imported) audio file. 


Editing only a selection of the audio file


To make a selection simply click and drag with the mouse on the waveform. By default snapping is used here as well. All editing is now done on the selection only. 


Cut/copy/paste


Once you have made a selection you may perform standard editing like cut, copy and paste with the shortcuts Ctrl + X, Ctrl + C and Ctrl + V. 


The Process menu


On the process menu you will find more editing option. Right-click the audio file and select Process. 


If you want to apply editing to the whole audio file, remove the selection by a a single click on the audio file. 


Normalize selection


To normalize the audio file, simply select Normalize from the Process menu.


Using external audio editor


If you have a favourite audio editor you may even use this to edit the audio file directly from energyXT. Just select the audio file, right-click to open the popup menu and select "Open with..." from the Process menu (shortcut: Ctrl + Shift + E)


Sell also: energyXT for PC/Mac/Linux | energyXT for iOS | energyXT on Facebook


Feb 14, 2011

Recording audio in energyXT

This tutorial will show you how to setup energyXT for audio recording.

1) Setting up your PC or Mac for recording.

In energyXT go to File > Setup > Audio to open the audio driver properties.

Windows: you need ASIO drivers for audio recording in Windows. If there is no audio drivers available for your soundcard, you may download universal ASIO driver from http://www.asio4all.com

Select ASIO as your device and then select your Soundcard. Next make sure that the audio inputs are activated by a checkmark.


Mac OS X: select input device for recording and output device for playback and make sure that the audio inputs are activated by a checkmark.


Linux: JACK is required for recording on Linux. See this page for more info.

2) Create a new project for recording

Select File > New and then select Empty as your project type.


3) Create a new Audio track

Click the Quick-add track button and select Audio from the popup menu. This will create a new track and by default it should now receive input from your soundcard.


Double-check that audio input is routed to the audio track. Right-click the track and select Input from the popup menu, then verify that Audio in is activated by a checkmark.


You should now see some activity inside the audio track when playing your guitar (or mic connected to audio input on your soundcard).


If this is not the case, make sure:

1 - You have selected audio device properly in Audio Setup
2 - Audio inputs are activated by checkmark in Audio Setup
3 - "Audio in" is routed top the audio track

4) Start recording

Well, before actually you start the recording there is a few things you can do. First you can enable the metronome. Click the Metronome icon in the toolbar to toggle it on/off, or right-click the icon  for more options.


You may also want to turn off Looping in the main transporter if you want to record more than 4 bars. Just click the Loop icon to toggle looping on/off. Or press the 'L' key.


Next, to start recording click the Record button in the transporter. Or press the 'R' key.


When you are done, click the Stop button or press the 'Space' bar. If recording was successful you should see the recorded waveform in the audio track.


If you need to process the recorded audio file, right-click it and select Process from the popup menu. Here you can do things like normalize and even open the file in an external Wave editor.


6) The recording didn't sound right on playback, now what?

Make sure your input signal is not too high, this will result in clipping and does not sound very nice.

If the recording is far too low or you get recording only in one channel, you could try to disable one of the audio input channels in the Modular view. Select Modular from the Window menu, then right-click the Audio-in component. Un-check the second channel and the try to record and see if it helps.


http://www.energy-xt.com

Dec 16, 2010

Beat-matching audio in energyXT

energyXT comes with built-in time-stretching and pitch-shifting, using the high-quality algorithm from http://www.zplane.de


This means you can beat- and tempo-match recorded audio tracks with the tempo of your current project. 


Here's an example of an audio file playing too slow. As you can see the length of the clip doesn't match the 130 bpm. 


Next, select Show object-bar from the Options menu. Or just press th 'o' key to open with shortcut. 


Now, make sure your audio file is highlighted (click to select), and then select Stretch from the Resample menu. 


Now that the audio file is in stretch mode, you can resize it to snap to the current tempo. Click and drag the end of the audio file to do this. 


Thats it. The file now plays in perfect sync even if you change the tempo of the project. 


http://www.energy-xt.com