Feb 14, 2011

Recording audio in energyXT

This tutorial will show you how to setup energyXT for audio recording.

1) Setting up your PC or Mac for recording.

In energyXT go to File > Setup > Audio to open the audio driver properties.

Windows: you need ASIO drivers for audio recording in Windows. If there is no audio drivers available for your soundcard, you may download universal ASIO driver from http://www.asio4all.com

Select ASIO as your device and then select your Soundcard. Next make sure that the audio inputs are activated by a checkmark.


Mac OS X: select input device for recording and output device for playback and make sure that the audio inputs are activated by a checkmark.


Linux: JACK is required for recording on Linux. See this page for more info.

2) Create a new project for recording

Select File > New and then select Empty as your project type.


3) Create a new Audio track

Click the Quick-add track button and select Audio from the popup menu. This will create a new track and by default it should now receive input from your soundcard.


Double-check that audio input is routed to the audio track. Right-click the track and select Input from the popup menu, then verify that Audio in is activated by a checkmark.


You should now see some activity inside the audio track when playing your guitar (or mic connected to audio input on your soundcard).


If this is not the case, make sure:

1 - You have selected audio device properly in Audio Setup
2 - Audio inputs are activated by checkmark in Audio Setup
3 - "Audio in" is routed top the audio track

4) Start recording

Well, before actually you start the recording there is a few things you can do. First you can enable the metronome. Click the Metronome icon in the toolbar to toggle it on/off, or right-click the icon  for more options.


You may also want to turn off Looping in the main transporter if you want to record more than 4 bars. Just click the Loop icon to toggle looping on/off. Or press the 'L' key.


Next, to start recording click the Record button in the transporter. Or press the 'R' key.


When you are done, click the Stop button or press the 'Space' bar. If recording was successful you should see the recorded waveform in the audio track.
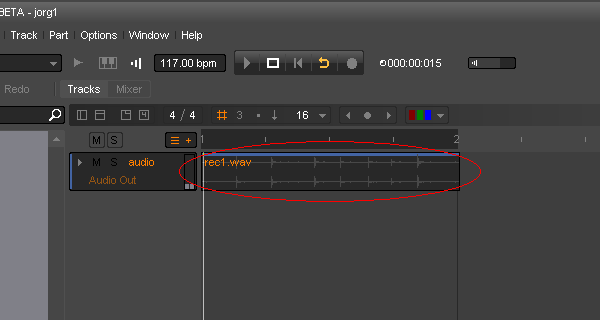

If you need to process the recorded audio file, right-click it and select Process from the popup menu. Here you can do things like normalize and even open the file in an external Wave editor.


6) The recording didn't sound right on playback, now what?

Make sure your input signal is not too high, this will result in clipping and does not sound very nice.

If the recording is far too low or you get recording only in one channel, you could try to disable one of the audio input channels in the Modular view. Select Modular from the Window menu, then right-click the Audio-in component. Un-check the second channel and the try to record and see if it helps.


http://www.energy-xt.com

Using your MIDI keyboard to control the Transporter (play, stop, rew, rec and tempo) in energyXT

In energyXT you can use your MIDI controller to start playback and recording. To enable this feature start by opening the Controller map by clicking the MIDI icon in the main toolbar.


In the Controller map window you can preview incoming MIDI data and see the MIDI values your controller is sending to the MIDI input of energyXT.


You can enter the MIDI CC value in the Transporter map to manually setup MIDI automation of each function of the transporter. Double-click the "--" and input the CC number of your choice. I will use CC 40 since that is what I see in the preview info.


You can also use MIDI learn to automatically setup MIDI automation of the transporter. First you need to enable MIDI learn by clicking the MIDI icon in the toolbar.


Next, you need to repeat 2 steps for each function.

1) Double-click the function you want to automate with your MIDI keyboard. In this example I double-click the Stop function. You should then see a question mark next to the Stop label.


2) Turn the next knob on your MIDI keyboard to tell energyXT what MIDI CC to use for automation Stop. In my example the next knob on my MIDI keyboard was CC 43 and is now mapped to the Stop function in the Transporter.


http://www.energy-xt.com

Dec 16, 2010

Beat-matching audio in energyXT

energyXT comes with built-in time-stretching and pitch-shifting, using the high-quality algorithm from http://www.zplane.de


This means you can beat- and tempo-match recorded audio tracks with the tempo of your current project. 


Here's an example of an audio file playing too slow. As you can see the length of the clip doesn't match the 130 bpm. 


Next, select Show object-bar from the Options menu. Or just press th 'o' key to open with shortcut. 


Now, make sure your audio file is highlighted (click to select), and then select Stretch from the Resample menu. 


Now that the audio file is in stretch mode, you can resize it to snap to the current tempo. Click and drag the end of the audio file to do this. 


Thats it. The file now plays in perfect sync even if you change the tempo of the project. 


http://www.energy-xt.com


Nov 18, 2010

Using downloaded samples (wav, aif, mp3) in energyXT

This tutorial will show how to use samples downloaded from the web inside energyXT. 


In energyXT you can use samples for the drum sampler, in audio tracks and in the synthesizer. Supported file formats are wav, aif and mp3 (require lame). 


First, create a folder on your disk to store the samples. In this example Im using c:\audio\samples but you may store the samples in a sub folder of energyXT or your documents folder. 


After unzipping and saving the sample its time to tell energyXT where to locate the samples. Select Setup from the File menu and click the Browser tab. Next select "Samples" and click the Add button. After adding the location of your samples it will look something like this: 


OK, the samples are now available in the main browser and can by dragged into the project. You can preview samples by click and hold with mouse or use the up/down arrow keys on your PC keyboard. 


Samples can be dragged into the track panel for use with drum tracks. Drag and drop below last track to create a new drum track loaded with the sample. You can open the drum editor and drag samples in there as well to add or replace the current drums. 


Samples may also be dragged into the the timeline. This will create a new audio track and works best for longer samples like vocal and guitar. 


The synthesizer in energyXT supports playback of samples. In the Zone view you can build presets of one or more samples. 


http://www.energy-xt.com

Nov 8, 2010

Using a MIDI keyboard in energyXT

In energyXT you can connect one or more MIDI keyboards and playback and record instrument and drum tracks.

Setup
energyXT usually will setup the first available MIDI keyboard by default. If not go to File > Setup > MIDI and make sure your MIDI keyboard is activated by a checkmark.


If your MIDI keyboard is working properly you can now see the MIDI indicator flash in the main toolbar.


Playback
Lets create some tracks to playback. Click the Quick-add button and select Synthesizer to add new track with an instrument. Playing the MIDI keyboard should now play the voices of the Synthesizer.


If you get no sound, double-check that the track is receiving data from MIDI in. Go to the Track > Input menu and make sure MDI in is activated by a checkmark.


Drum track
When using the MIDI keyboard to playback drum tracks, C1 is automatically mapped to the first drum, C#1 to the second, D1 to the third etc.


Velocity
You may change the sensitivity of your MIDI keyboard for each track in the Object-bar (see Options menu or press 'o' key to open the object-bar)


Nov 4, 2010

Installing LAME on mac - for mp3 import/export

This will show you how to install the LAME mp3 encoder for use with energyXT 2.5.3 on Mac OSX.

1) Open your web browser and visit http://www.thalictrum.com/ then go to the Products section
2) Download the LAME Audio Encoder 3.97
3) Run the installer to extract all files (/usr/local/bin)
4) Open the 'Terminal' application (type Terminal in spotlight)
5) In the Terminal type: 'cp /usr/local/bin/lame /Applications/energyXT/' to copy the lame binary into the energXT folder

energyXT should now find the LAME encoder. Note, we are working to improve this in future release.

http://www.energy-xt-com

Oct 1, 2010

Share your music online with SoundCloud

Do you have a song you want to publish online, or get some feedback on the current mix? Now you can easily share your tracks with energyXT and SoundCloud.


Once you have your tracks stored online on your Soundcloud account,  you can then share the URL's on facebook, twitter, email or even have an embedded player on your own website. 


Here's how to use the Share with SoundCloud feature:

1) Open the export dialog from the File menu (or press F5)


2) Set your preferred file format and click the Share button. First time you will be asked to download  the Soundcloud add-on. Click OK. 


3) Click connect to SoundCloud and loginRegister a free souncloud.com account if you dont have one already.


4) Enter the access code in energyXT


5) Enter song name and then click the Upload button


6) On success, the uploaded URL will be displayed. Copy the link to share your track on email, facebook or twitter.