1) Setting up your PC or Mac for recording.
In energyXT go to File > Setup > Audio to open the audio driver properties.
Windows: you need ASIO drivers for audio recording in Windows. If there is no audio drivers available for your soundcard, you may download universal ASIO driver from http://www.asio4all.com
Select ASIO as your device and then select your Soundcard. Next make sure that the audio inputs are activated by a checkmark.

Mac OS X: select input device for recording and output device for playback and make sure that the audio inputs are activated by a checkmark.

Linux: JACK is required for recording on Linux. See this page for more info.
2) Create a new project for recording
Select File > New and then select Empty as your project type.

3) Create a new Audio track
Click the Quick-add track button and select Audio from the popup menu. This will create a new track and by default it should now receive input from your soundcard.

Double-check that audio input is routed to the audio track. Right-click the track and select Input from the popup menu, then verify that Audio in is activated by a checkmark.

You should now see some activity inside the audio track when playing your guitar (or mic connected to audio input on your soundcard).

If this is not the case, make sure:
1 - You have selected audio device properly in Audio Setup
2 - Audio inputs are activated by checkmark in Audio Setup
3 - "Audio in" is routed top the audio track
4) Start recording
Well, before actually you start the recording there is a few things you can do. First you can enable the metronome. Click the Metronome icon in the toolbar to toggle it on/off, or right-click the icon for more options.

You may also want to turn off Looping in the main transporter if you want to record more than 4 bars. Just click the Loop icon to toggle looping on/off. Or press the 'L' key.

Next, to start recording click the Record button in the transporter. Or press the 'R' key.

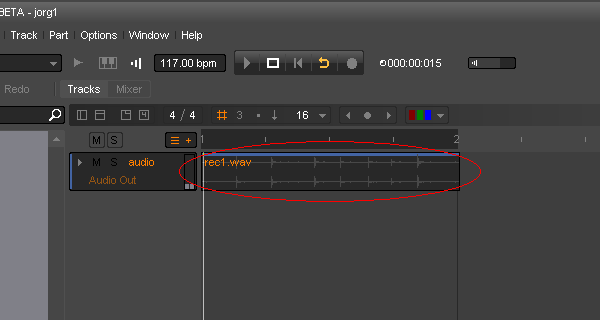
When you are done, click the Stop button or press the 'Space' bar. If recording was successful you should see the recorded waveform in the audio track.
If you need to process the recorded audio file, right-click it and select Process from the popup menu. Here you can do things like normalize and even open the file in an external Wave editor.

6) The recording didn't sound right on playback, now what?
Make sure your input signal is not too high, this will result in clipping and does not sound very nice.
If the recording is far too low or you get recording only in one channel, you could try to disable one of the audio input channels in the Modular view. Select Modular from the Window menu, then right-click the Audio-in component. Un-check the second channel and the try to record and see if it helps.

http://www.energy-xt.com